- Published on
Postman API platform – Part 3: Advanced Concepts
- Authors

- Name
- Aleksandar Zeljković
- @a_zeljkovic
In the third article of the Postman API platform series, we are going to dive deeper into GraphQL, gRPC and WebSocket requests, as well as mock servers.
GraphQL requests
GraphQL is a query language that presents the abstraction layer which enables API consumers to write queries for a fine-grained data selection for a selected endpoint. Postman has built-in support for GraphQL, which can be found in the request area under the Body section. Let’s take a look at the example. As an example API, I am going to use a GraphQL Weather API created by Konstantin Münster. The API URL is https://graphql-weather-api.herokuapp.com, while the documentation can be found at https://github.com/konstantinmuenster/graphql-weather-api.
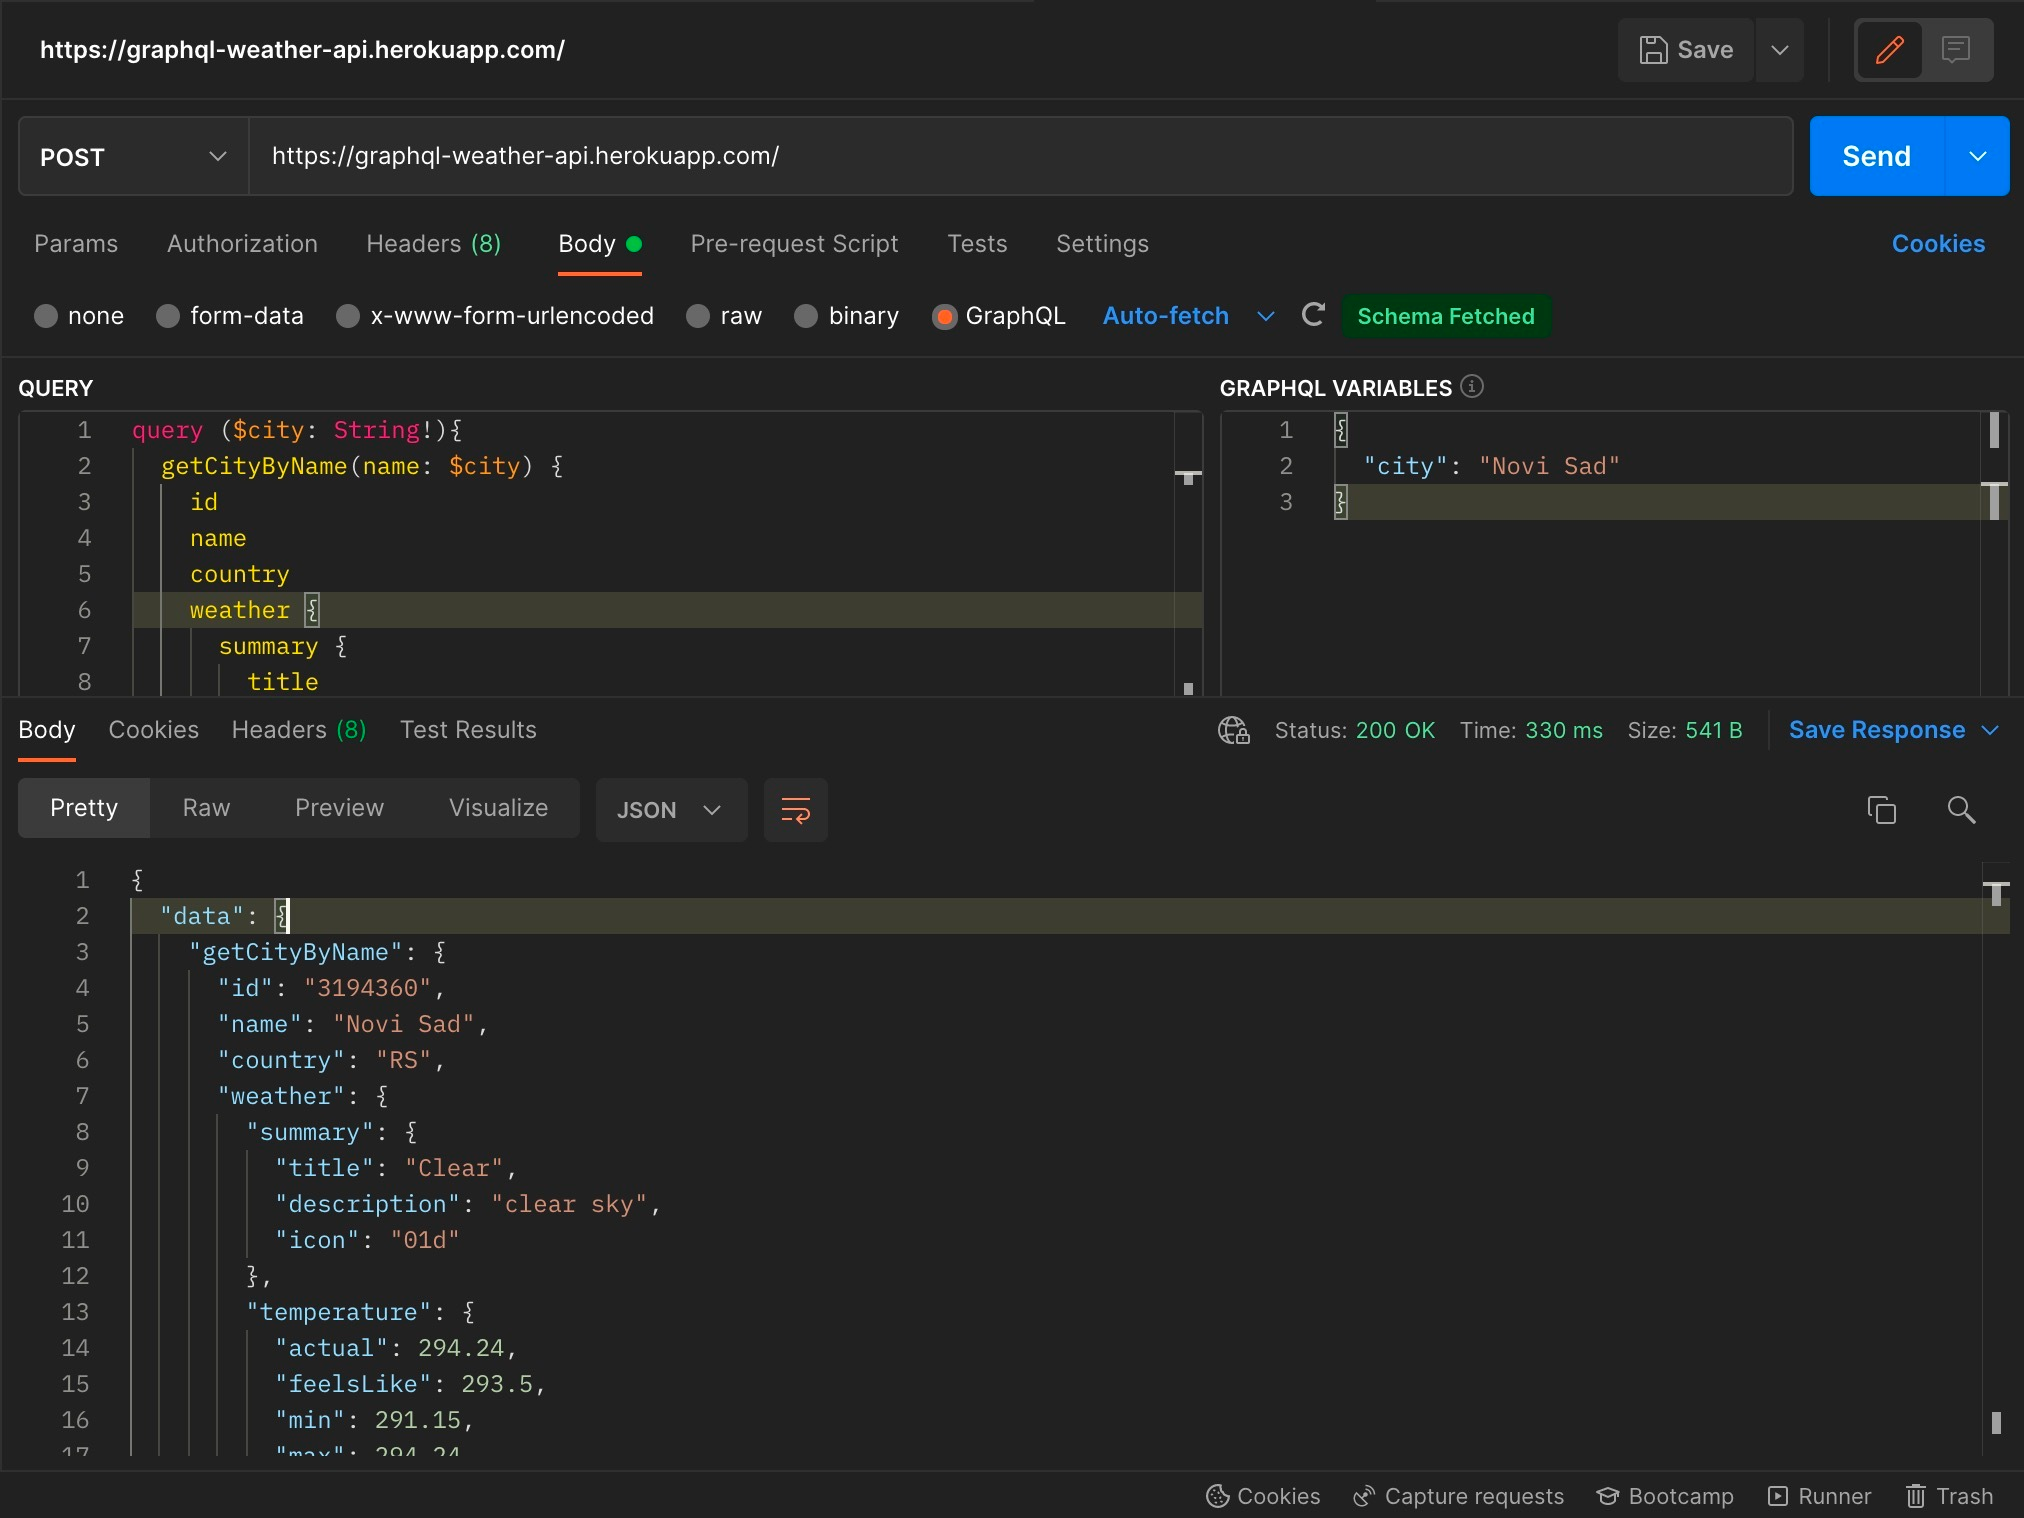
First, we are going to set the API URL in the URL field and select the POST verb. Postman will automatically fetch the schema from the server to provide the auto-completion feature. Now let’s create a first query to get the temperature and wind for the city of Novi Sad:
query {
  getCityByName(name: "Novi Sad") {
    id
    name
    country
    weather {
      summary {
        title
        description
        icon
      }
      temperature {
        actual
        feelsLike
        min
        max
      }
      wind {
        speed
        deg
      }
      timestamp
    }
  }
}
Once we have written a query and clicked the Send button, the server will return the desired data:
{
  "data": {
    "getCityByName": {
      "id": "3194360",
      "name": "Novi Sad",
      "country": "RS",
      "weather": {
        "summary": {
          "title": "Clear",
          "description": "clear sky",
          "icon": "01d"
        },
        "temperature": {
          "actual": 294.24,
          "feelsLike": 293.5,
          "min": 291.15,
          "max": 294.24
        },
        "wind": {
          "speed": 2.72,
          "deg": 20
        },
        "timestamp": 1648384872
      }
    }
  }
}
Next, let’s move variables to the GraphQL Variables section:
{
  "city": "Novi Sad"
}
Now we can reuse the variable in the query:
query ($city: String!){
  getCityByName(name: $city) {
...
The whole request and response should look like this:
gRPC requests
gRPC is Google’s implementation of the Remote Procedure Call framework. While still in beta, Postman enables the making of gRPC calls. For the demonstration purpose, we’re going to use grpcbin – documentation can be found at https://grpcb.in. First, let’s set the server URL to grpc://grpcb.in:9000 (don’t forget to match the protocol). Proto files can be imported in four ways:
- using server reflection
- importing a proto file from the local machine
- importing a proto file from the URL
- or creating a proto file directly in Postman
For the sake of simplicity of this example, we are going to use the server reflection which will return all available methods. Now, let’s select the Add / Contact method from the method dropdown menu, which will concatenate two strings. If we invoke a function by clicking the Invoke button, we are going to get an empty response. The reason for this is the absence of parameters in the request. Let’s fix this by adding two strings as parameters in the Message field – strings a and b:
{
  "a": "hello",
  "b": "world"
}
If you are not sure what the message schema should look like, you can click on the “Generate Example Message” button. Be aware that the public service used in this example is not very stable, so it is likely that you are going to face a failure/error while you are using it. Also, be aware that gRPC error codes are not the same as HTTP status codes. More info about gRPC status codes can be found at https://grpc.github.io/grpc/core/md_doc_statuscodes.html.
However, if the request is completed successfully, it should look something like this:
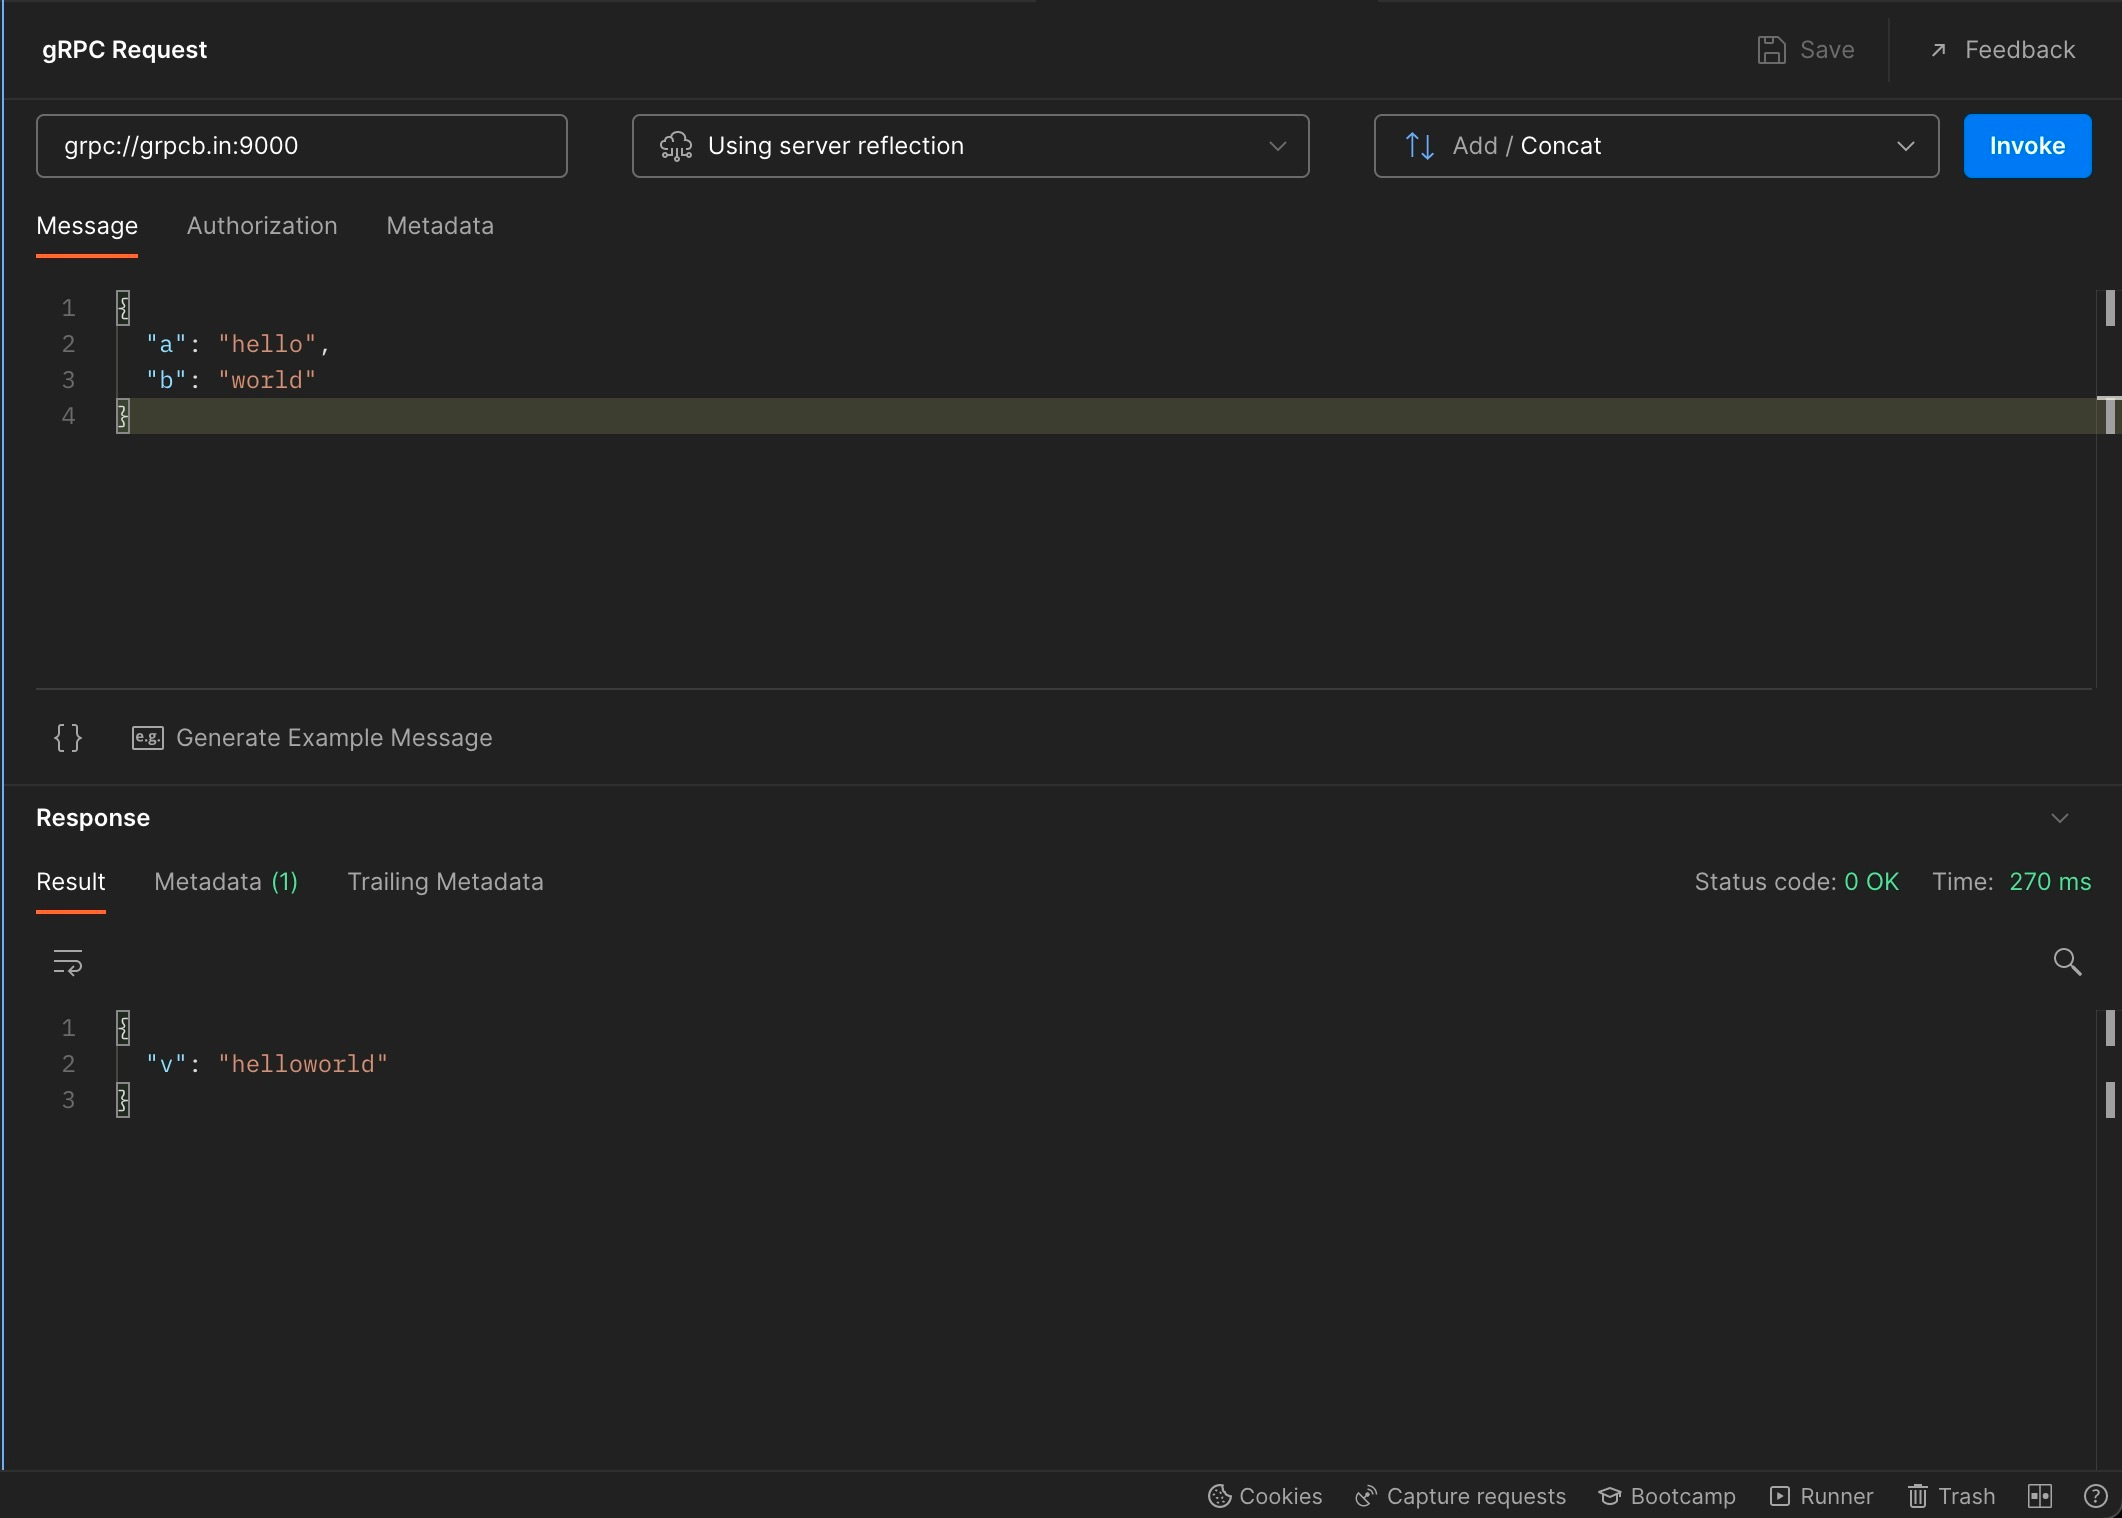
We can see a server response with the concatenated string helloworld, status code 0 and the request time.
WebSocket requests
The WebSocket is a web protocol for persistent, two-way communication between client and server using a persistent connection that (once an initial connection is done) does not require multiple HTTP requests exchange.
To create a new WebSocket connection in Postman, we can click on the New button, and then choose WebSocket request (which is still in beta, same as gRPC). For this example, I’m going to use Socketsbay example WebSocket server which can be found at https://socketsbay.com/test-websockets. There we can find a server URL, and we can connect to it from our browser by clicking the Connect button. To connect to the server through Postman, we can copy the server URL (wss://socketsbay.com/wss/v2/2/demo) to the URL field. If Postman manages to connect, we should see the appropriate message in the message section, and we should see the Connected status below the Send button. Now, if we type some message and click Send button, we will see it on the socketbay webpage. The same will happen if we do it the opposite way – the message sent from the browser will be visible in Postman:
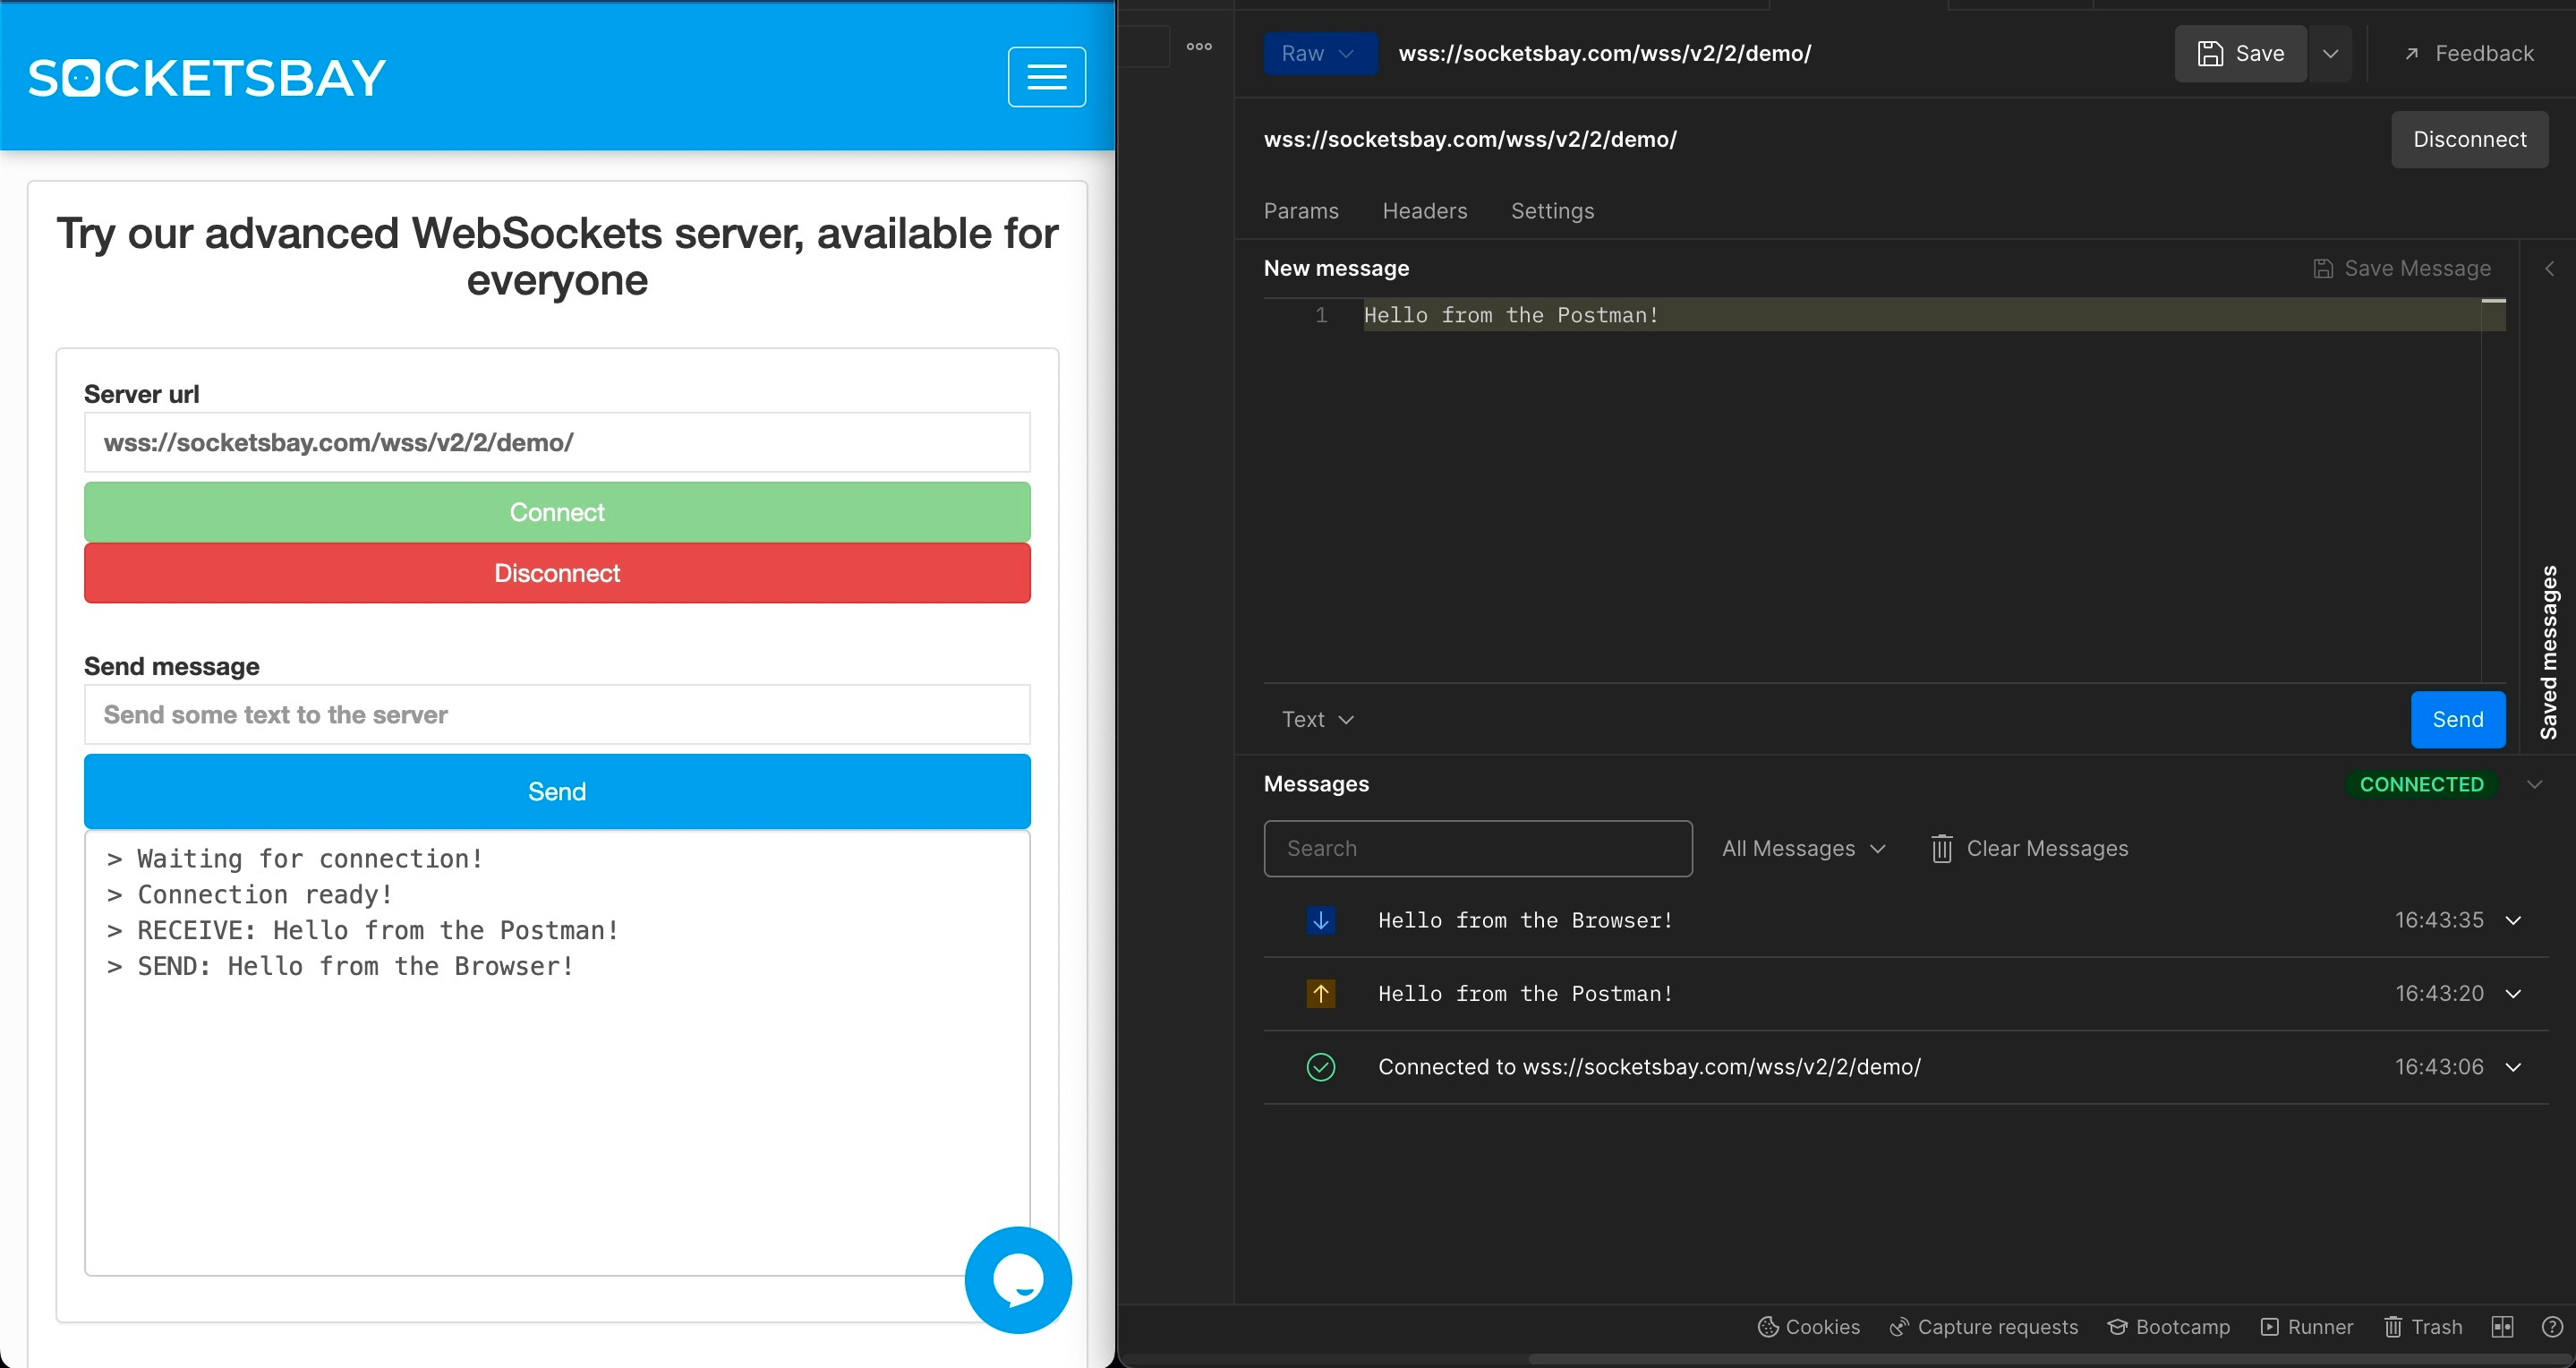
We can differentiate received and sent messages in the Messages section via different arrow types.
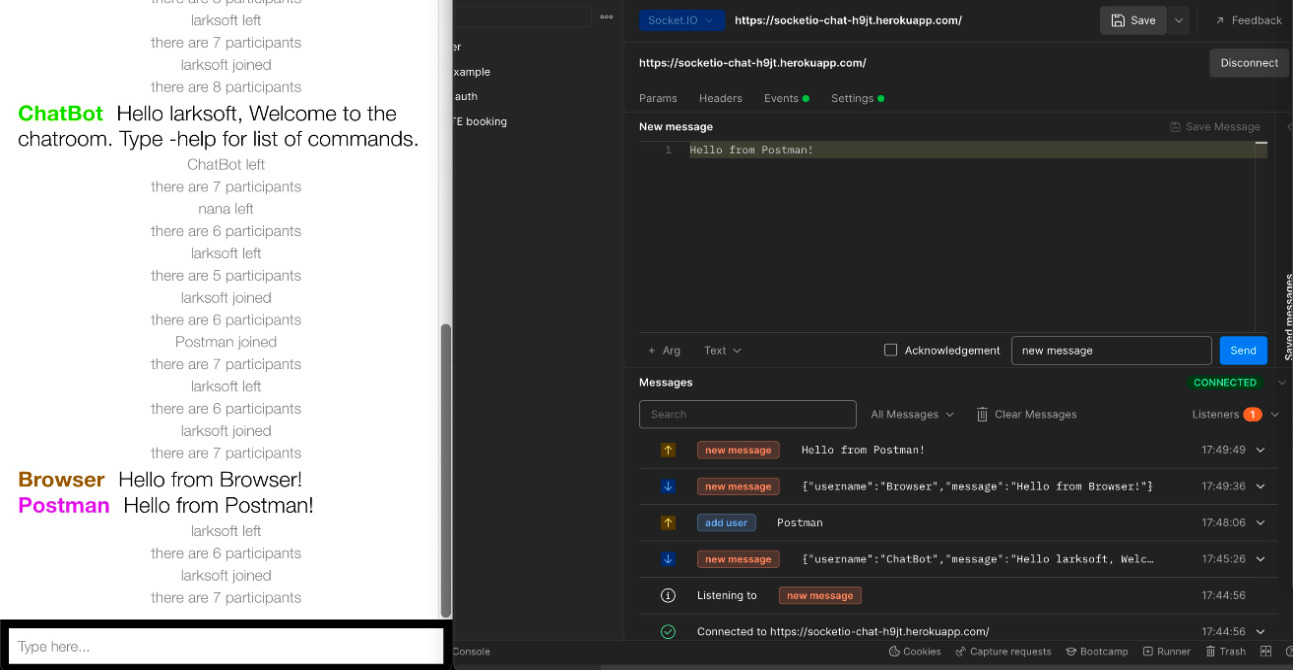
Now let’s send some messages to the Socket.IO WS server. To do this, we need to change the message type from Raw to Socket.IO (top left, blue dropdown menu). As an example server, I’m going to use Socket.io demo chat: https://socketio-chat-h9jt.herokuapp.com. In the browser, I’m going to register a new user called Browser. In Postman, I want to be able to receive messages, so I want to listen to the new message event. I can do this by adding the event name in the Events tab and checking the Listen on connect option. After adding the server URL, I’m clicking the Connect button to connect and listen to the desired event. We are going to be warned that we are trying to connect to a v2 server with a v3 client. This can be fixed by changing the client version to v2 in the Settings. Once we are connected, we are receiving messages from other users from the server. If we want to send messages from the Postman, we first need to register a user. This can be done by adding the add user event with the desired username. The example of a message exchange between the browser and the Postman will look like this:
Creating a mock server
Mock servers can be useful for simulating unusual response formats and data, unfinished APIs, etc.
Overview of all created mock servers as well as the creation of the new mock server can be done from the Mock Servers section which can be accessed from the left bar in Postman.
Postman free tier contains 1000 mock server API calls per month. For more, you will need to upgrade your Postman subscription.
Postman provides two ways to create a mock server:
- New collection with a mocked API
- Mock server from an existing collection
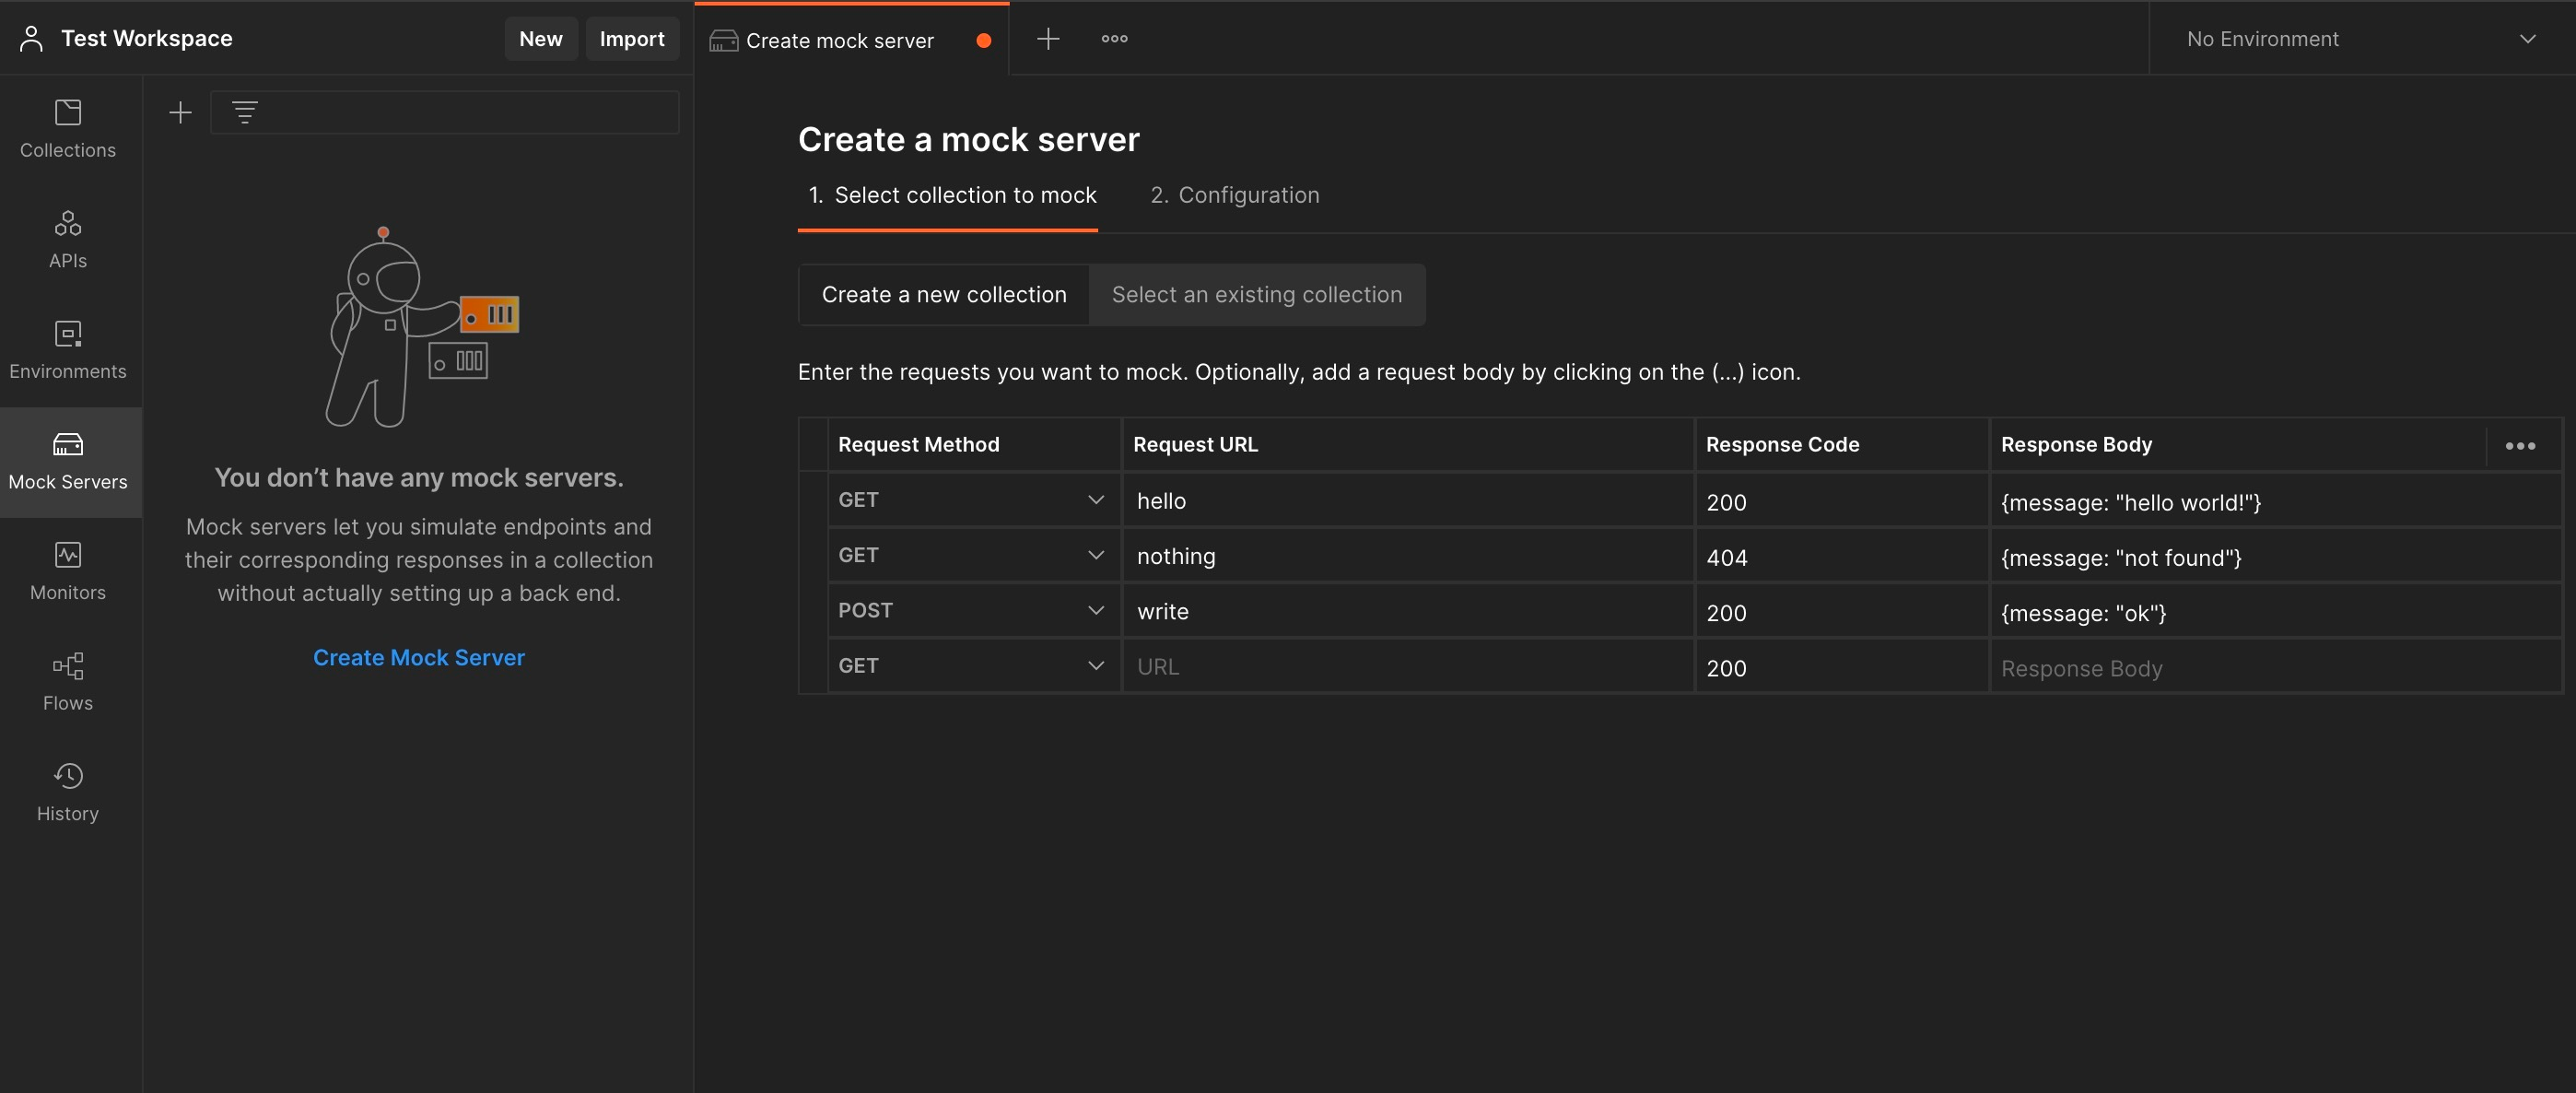
If we are creating a new collection from scratch, request URLs with the corresponding method, response code and body are being set.
Afterward, additional configuration is being added:
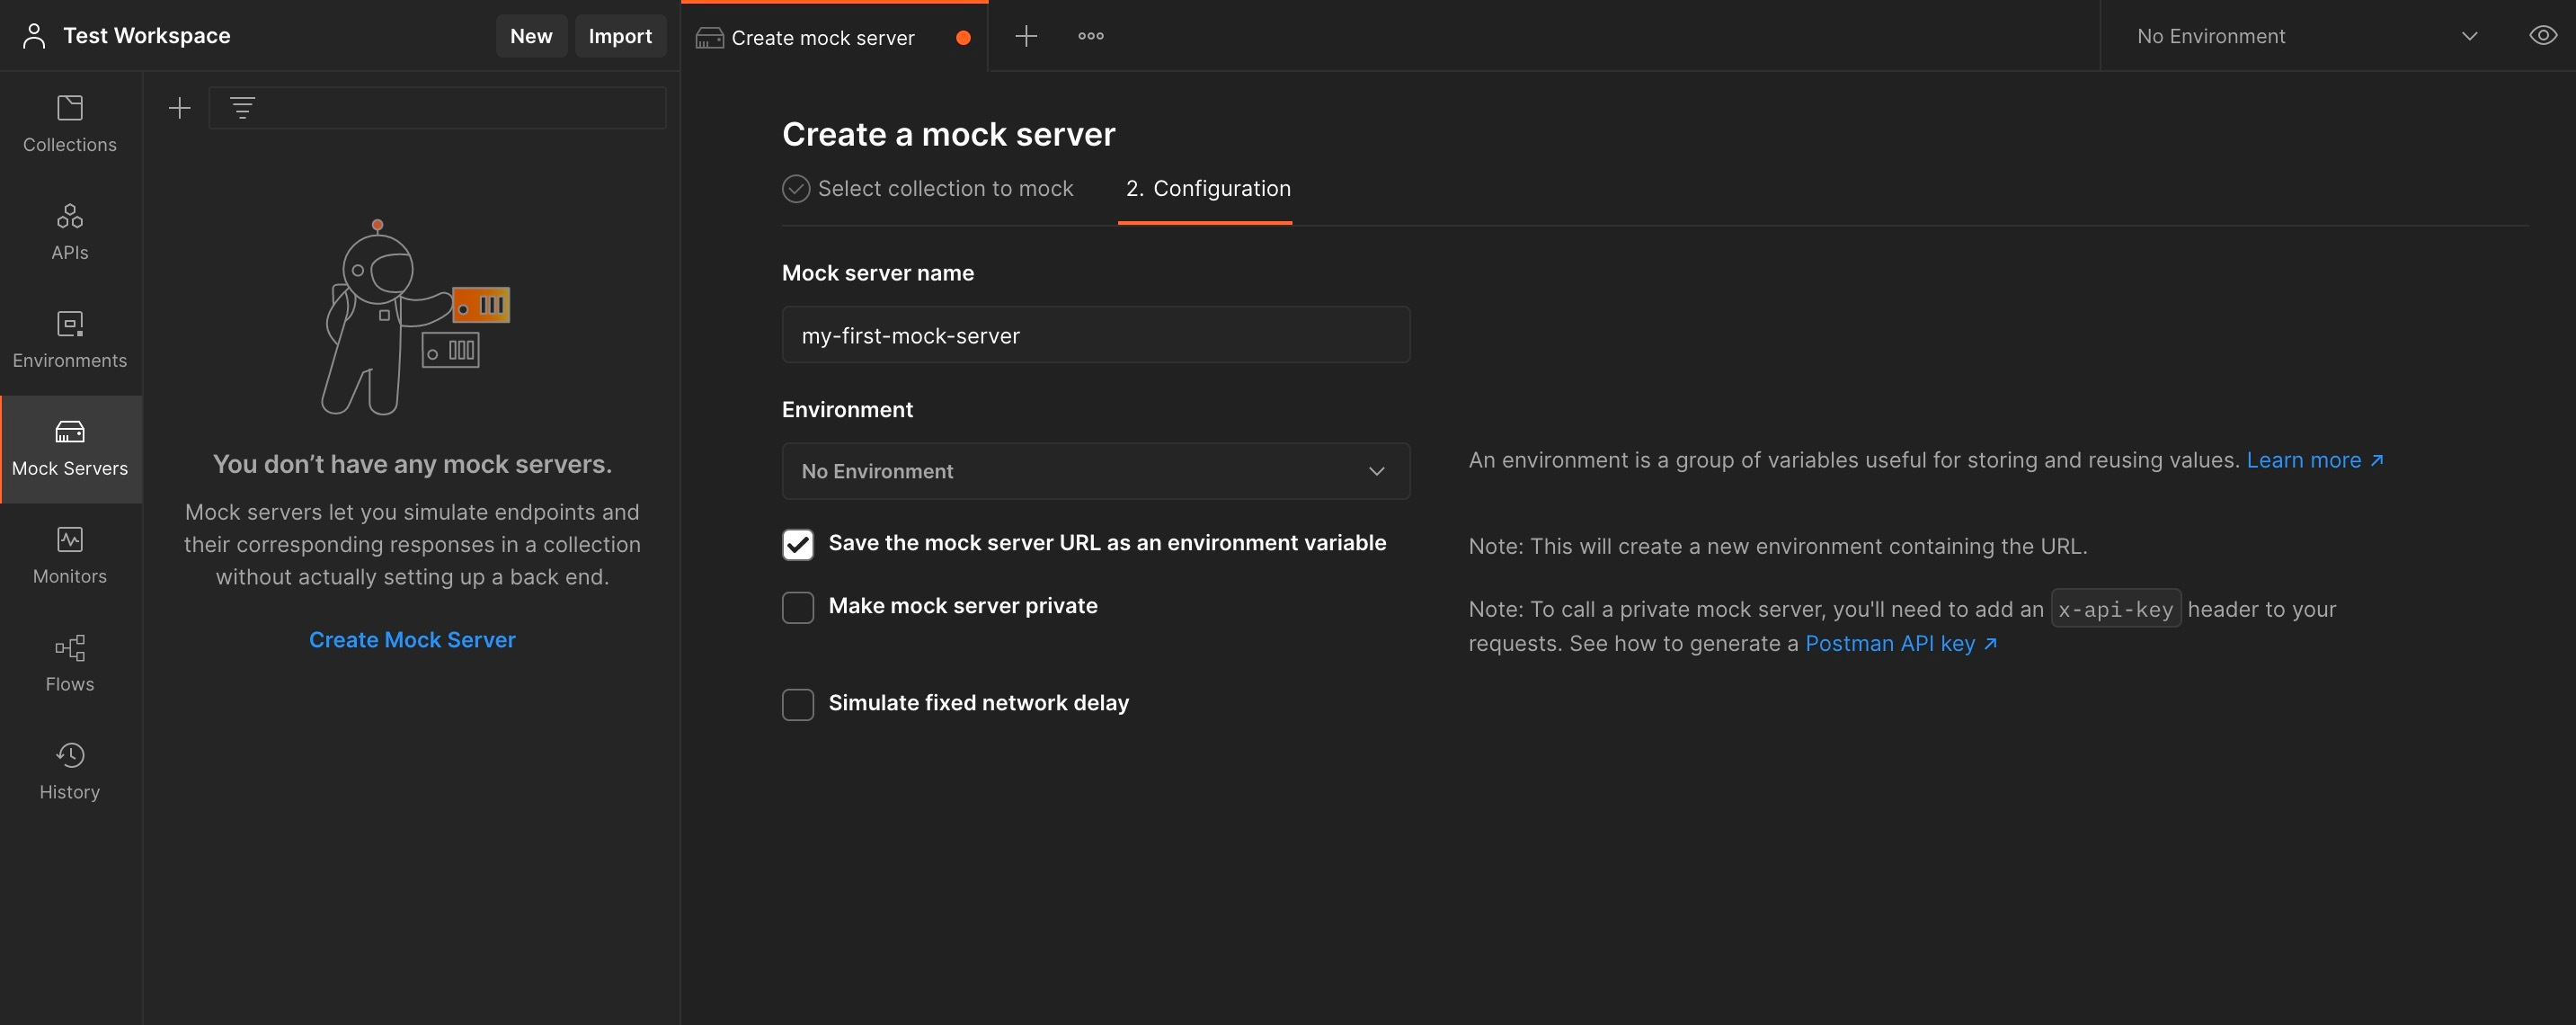
It is necessary to set a unique mock server name, and optionally URL can be saved to the environment for easier manipulation. The mock server can be switched to private mode, which will require setting a postman API key for authentication. Finally, network delay can be simulated with 3G, 2G, or a custom amount of time.
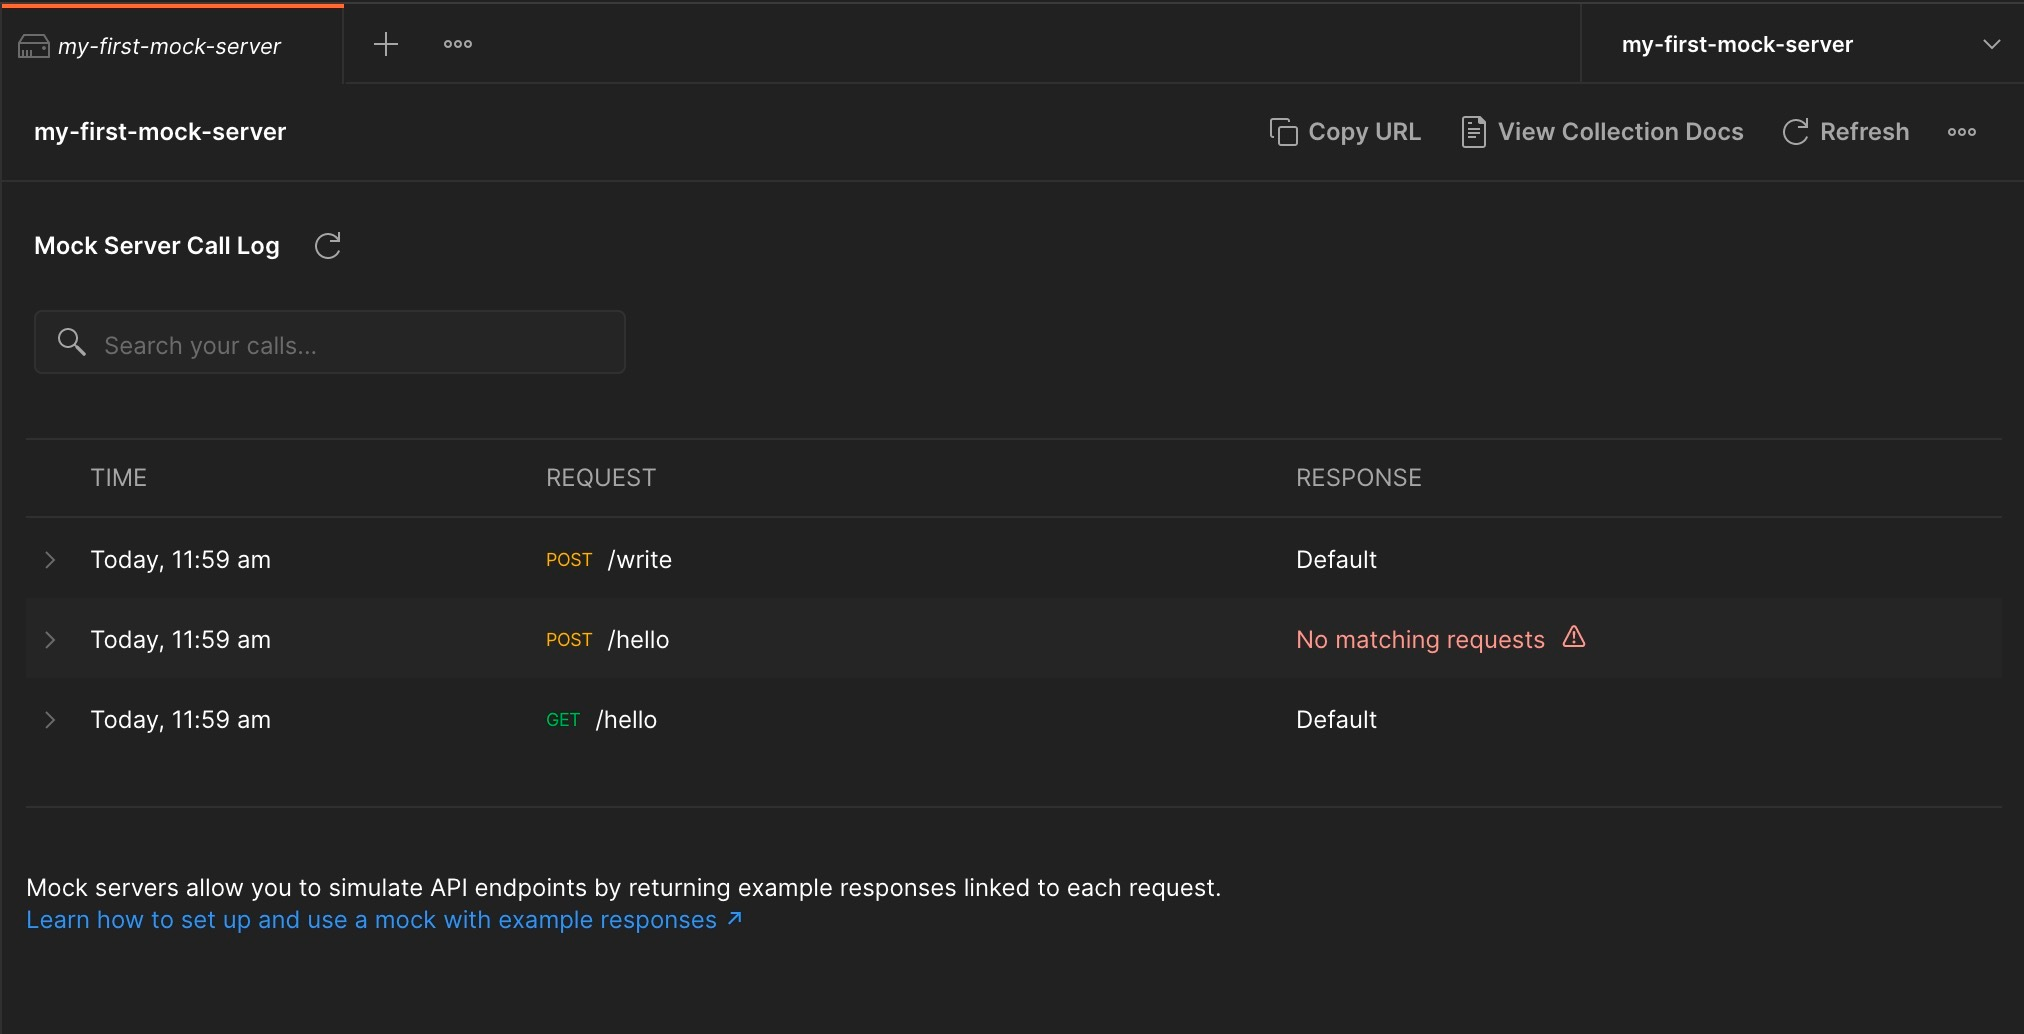
When we open the mock server, the first thing that we get is the call log – a list of the recent API calls for a given mock server (in case we are having recent mock server calls).
Clicking on the View Collection Docs button, we are getting all the essential information about our mock server endpoints:
- list of all endpoints
- release tag
- URLs
- request code examples in different programming languages
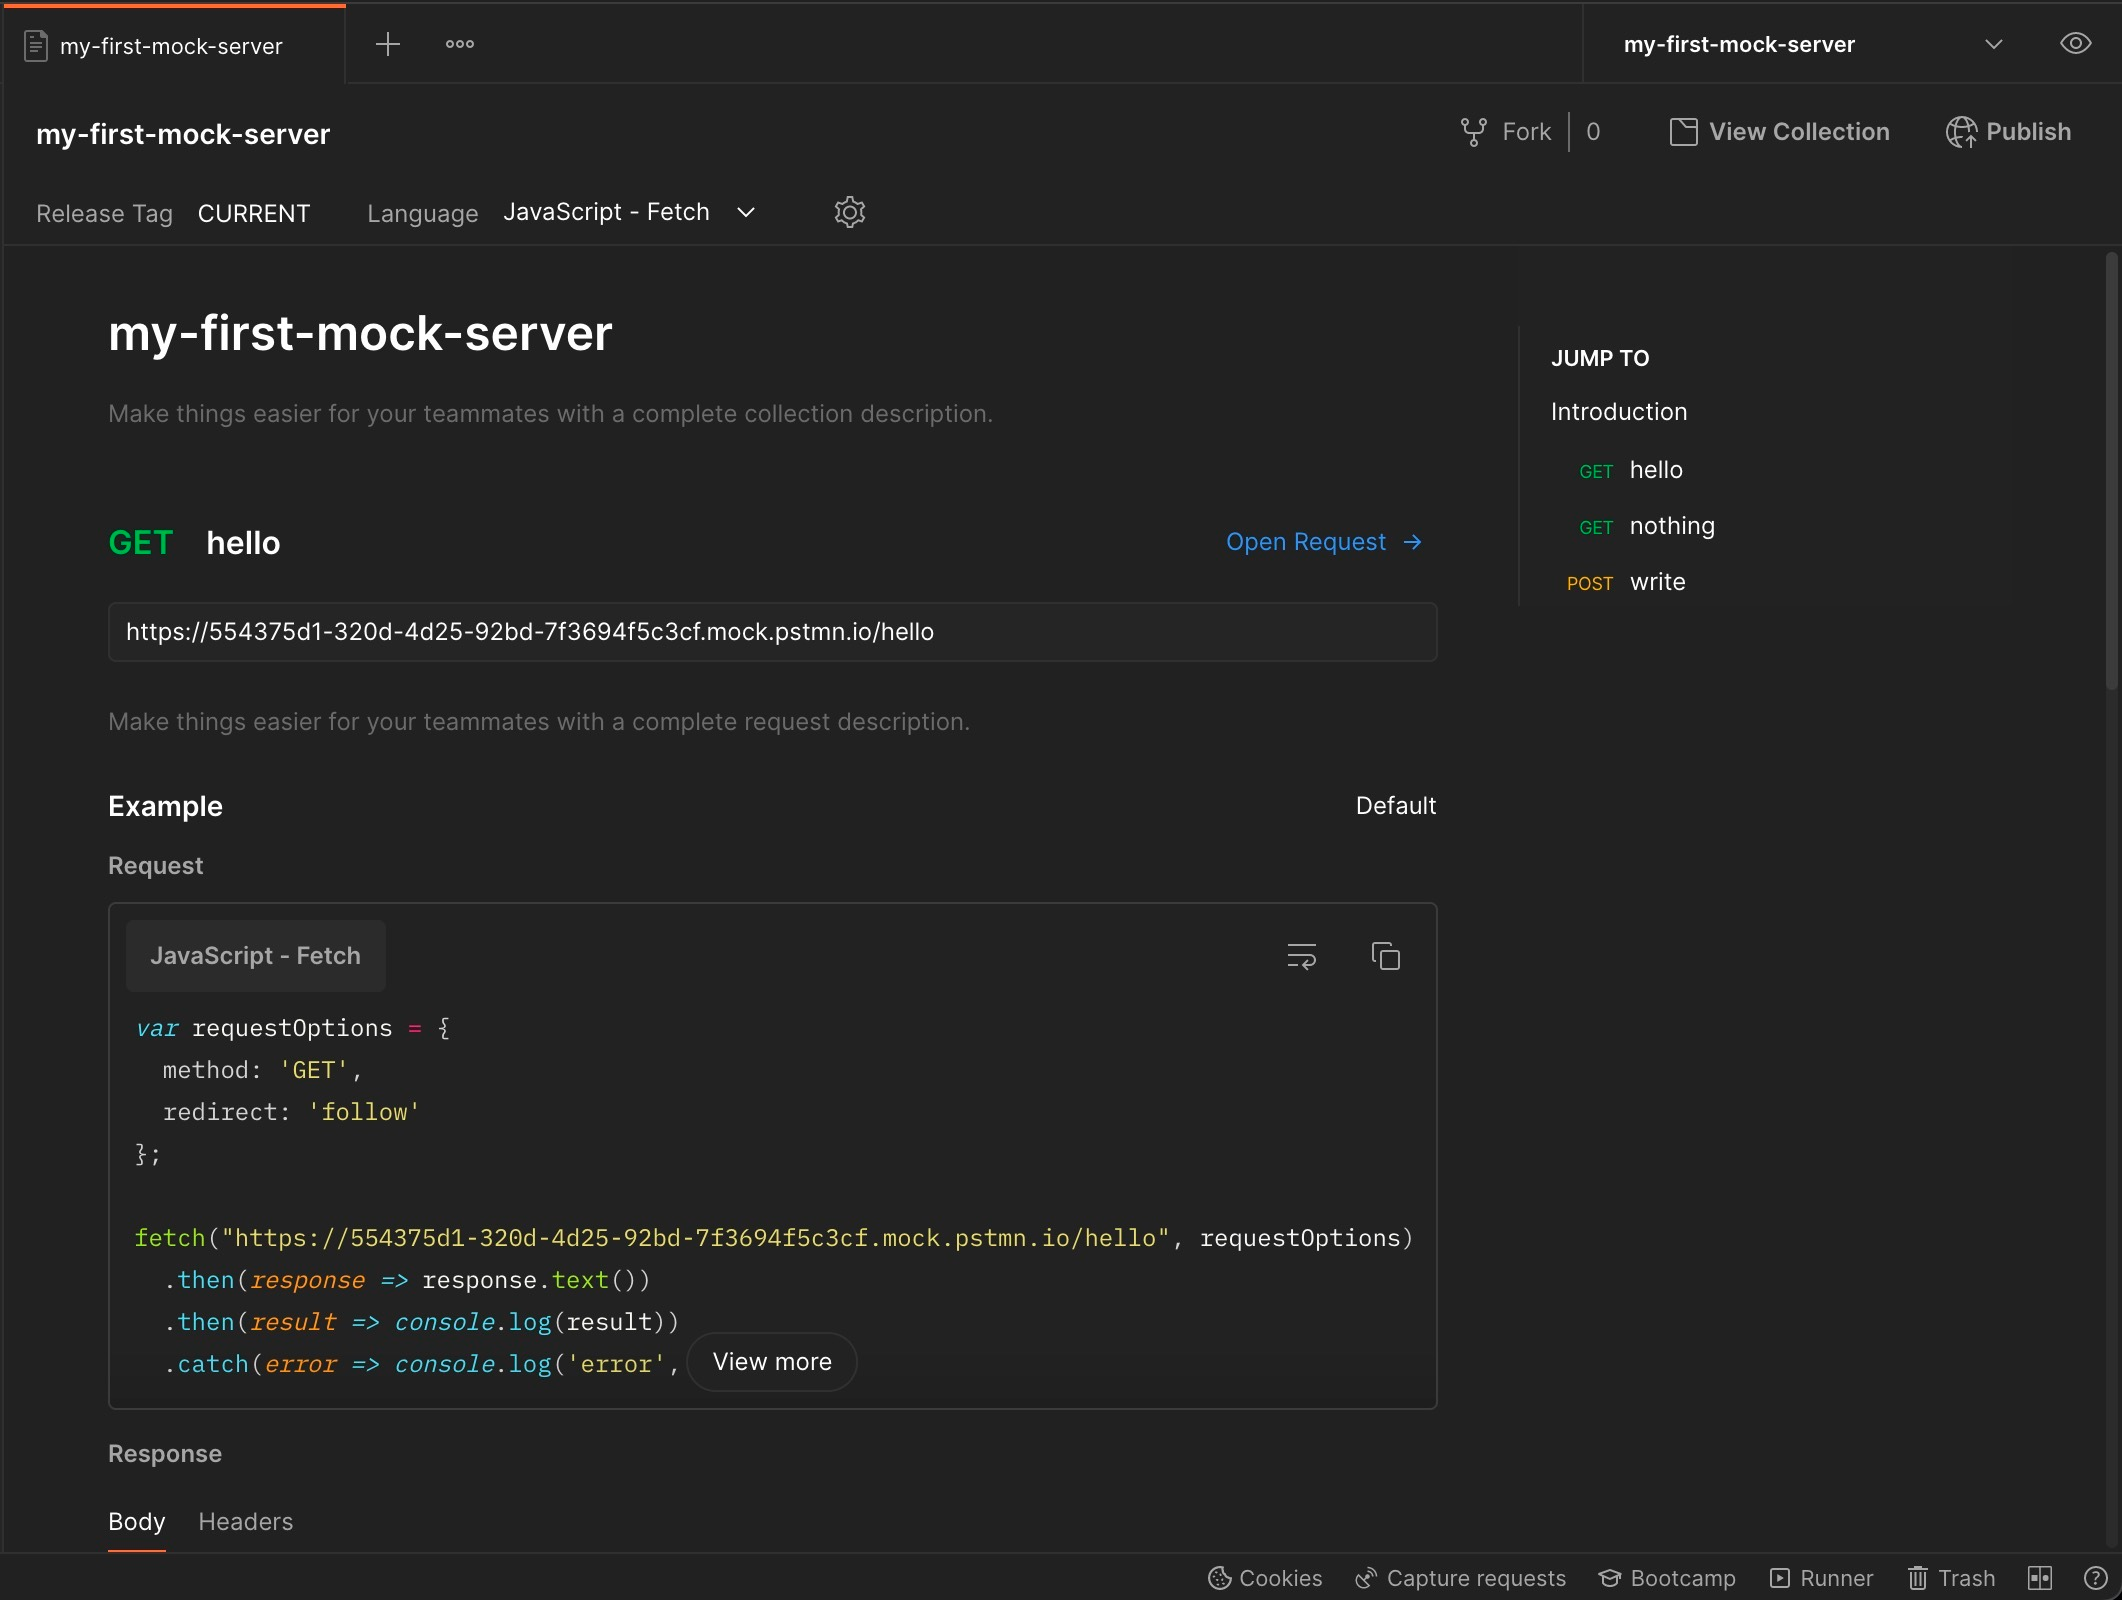
We can send the request to a mock server using generated code samples, or directly in Postman via the Open Request link which will open a new tab with the desired request data.
Conclusion
This series of articles about the Postman API platform describes some basic Postman capabilities like making REST API calls, API monitoring, making collections, writing and running tests, using other protocols, etc. Throughout the years, Postman grew significantly in terms of complexity and number of features. This is only a surface of Postman’s capabilities, but it should be enough for an average user to be able to confidently develop and test web APIs.
Useful links
GraphQL:
https://graphql-weather-api.herokuapp.com
https://github.com/konstantinmuenster/graphql-weather-api
gRPC:
https://grpc.github.io/grpc/core/md_doc_statuscodes.html
WebSocket: